


A vendor can put “knowledge graph management” on an AEO spec sheet and charge four figures a month for it. For most client sites, I would start with something less theatrical: a few hundred lines of JSON-LD, verified off-site profiles, and a way to put the markup in the site’s HTML.
WordLift lists an $879-a-month Business tier with URL limits, while Schema App puts multi-domain pricing behind a sales conversation. Neither changes the hard part of this job. The skill is keeping an entity’s identity consistent across the site and the profiles that describe it. Build that once as a template, and an agency can adapt it across 15 client domains without buying a platform to type the same relationships 15 times.
What you need and what you will ship
Set aside roughly 90 minutes for the first domain. Before you start, get a blank spreadsheet, access to the client’s CMS header settings, and the business’s legal name, street address, phone number, principal profiles, and official social and registry URLs. You will need the live pages that describe its people and services, too. Do not fill gaps from memory.
At the end, you will have:
- A JSON-LD
@graphcontaining connectedOrganization,Person,Service, andWebSitenodes. - A
sameAsarray containing only profiles you have checked against the client’s identity. - A variable-based template and QA routine you can reuse for 15 domains.
The machining company below is an illustrative example, not a set of verified client details. Replace its names, URLs, address, and credentials before publishing anything.
Step 1: Inventory entities before writing JSON
Open a blank sheet and name it [Client_Name]_Entity_Inventory. Add these columns, then enter one row for each entity you intend to describe:
Entity_Type:Organization,Person,Service, orWebSite.Internal_ID: An absolute URI such ashttps://example.com/#organizationorhttps://example.com/services/subsea-machining#service.Canonical_URL: The relevant permanent page on the client’s site.Legal_Name: The registered business name or the person’s name, as applicable. Check the footer and available filings.Description: One plain-English sentence consistent with the destination page.SameAs_Wikidata: The Wikidata item URL, if one exists; otherwise leave it blank.SameAs_GBP: The Google Maps CID URL for the location, if applicable.SameAs_Profiles: Canonical URLs for the client’s relevant company profiles and official registries.Parent_Relationship: TheInternal_IDof the entity that owns, employs, or provides this node, where applicable.
Expected result: One Organization row, the WebSite row, one or two real principals if the site identifies them, and roughly three to five core services. Each row has a permanent URL where the site actually describes that entity.
Mistake: Turning every blog category, campaign, and landing-page variation into a separate entity. If it has no durable page or operational identity, leave it out. A smaller graph you can reconcile beats a crowded one you cannot explain.
Step 2: Give the organization one persistent @id
Open a text editor. Put the nodes in one @graph array so later nodes can refer to the organization without repeating its details. Momentic Marketing’s explanation of entity schema describes this use of persistent @id URIs.
Copy the base payload and replace every illustrative value with the matching inventory entry. The organization’s @id is the anchor you will reuse in the next step.
{
  "@context": "https://schema.org",
  "@graph": [
    {
      "@type": "Organization",
      "@id": "https://example.com/#organization",
      "name": "Apex Precision Machining",
      "legalName": "Apex Precision Machining LLC",
      "url": "https://example.com",
      "logo": {
        "@type": "ImageObject",
        "@id": "https://example.com/#logo",
        "url": "https://example.com/assets/logo.png",
        "caption": "Apex Precision Machining Logo"
      },
      "address": {
        "@type": "PostalAddress",
        "streetAddress": "1420 Industrial Parkway, Suite 200",
        "addressLocality": "Cleveland",
        "addressRegion": "OH",
        "postalCode": "44135",
        "addressCountry": "US"
      },
      "contactPoint": {
        "@type": "ContactPoint",
        "telephone": "+1-216-555-0144",
        "contactType": "customer service",
        "availableLanguage": ["en"]
      }
    }
  ]
}
Expected result: One organization node with an absolute @id. Services and people will point to that same string; they do not need their own copies of the address and logo.
Mistake: Using "@id": "#organization" and assuming it will mean the same thing on every page. Use the absolute canonical URI. Also check the name and address against visible site copy. If the footer says Apex Machining Group while the graph says Apex Precision Machining LLC, resolve the discrepancy rather than calling it an SEO problem.
Step 3: Connect people, services, and the website
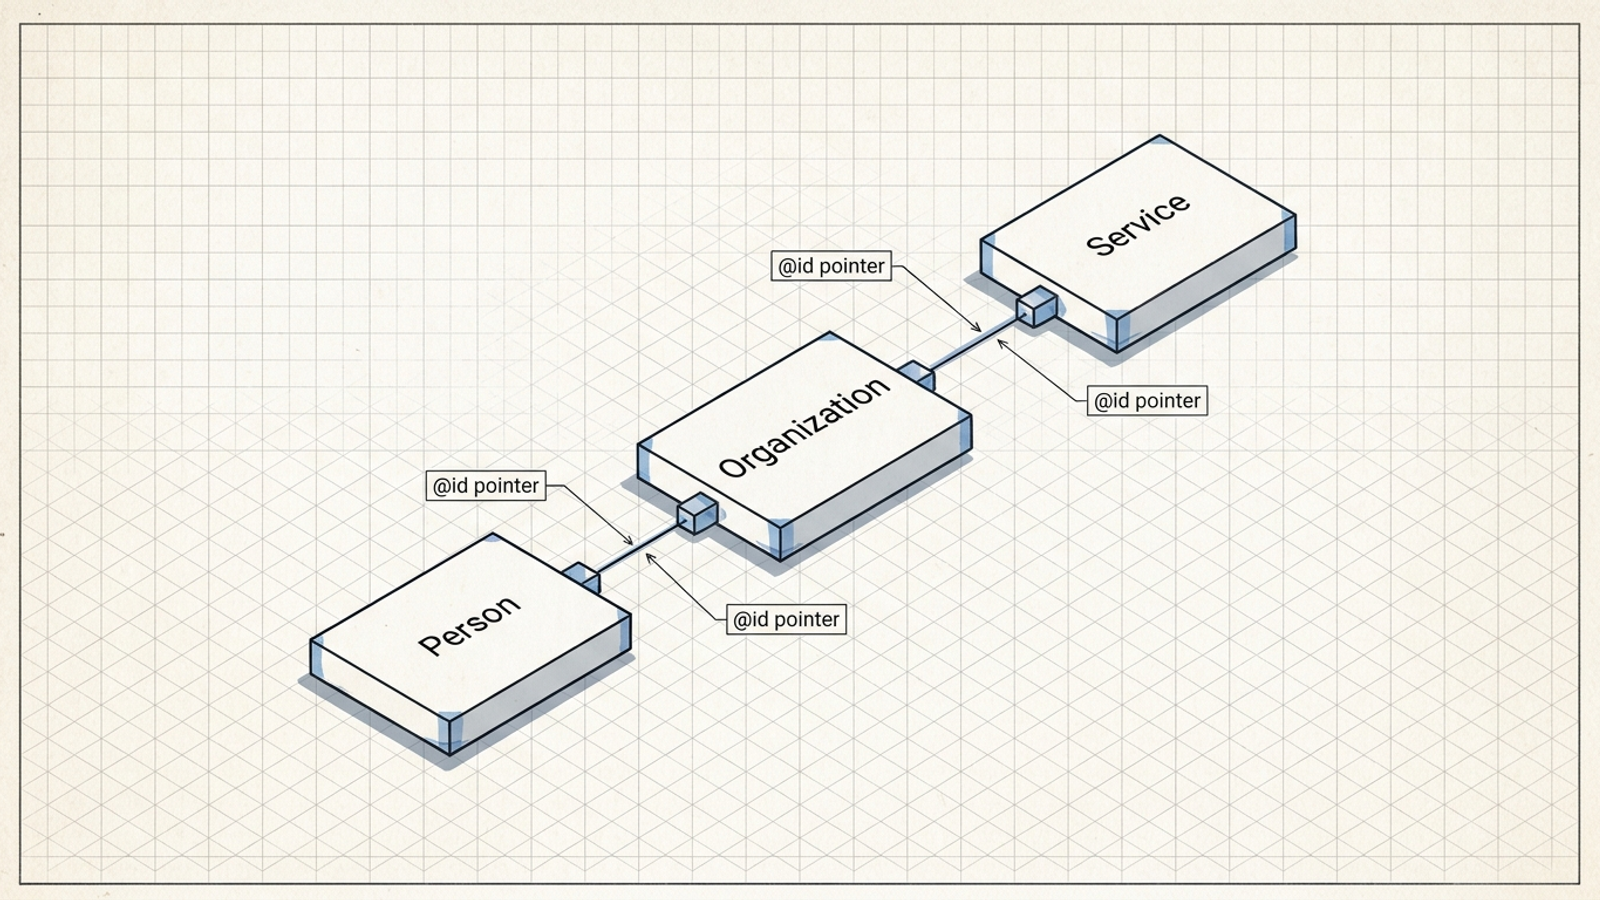
Add a comma after the closing brace of the Organization node inside @graph. Then append the following nodes, replacing the illustrative details. This block is an array fragment, not a standalone JSON document: its @id references must match the organization URI you chose in Step 2.
{
  "@type": "Person",
  "@id": "https://example.com/team/elena-rostova#person",
  "name": "Elena Rostova",
  "jobTitle": "Chief Metallurgist & Co-Founder",
  "worksFor": {
    "@id": "https://example.com/#organization"
  },
  "alumniOf": {
    "@type": "EducationalOrganization",
    "name": "Case Western Reserve University"
  },
  "knowsAbout": [
    "Titanium CNC Machining",
    "Subsea Aerospace Alloys",
    "ISO 9001 Quality Control"
  ]
},
{
  "@type": "Service",
  "@id": "https://example.com/services/subsea-machining#service",
  "name": "Subsea Titanium Machining",
  "url": "https://example.com/services/subsea-machining",
  "description": "High-tolerance CNC machining for 5-axis subsea titanium valve bodies and manifolds.",
  "provider": {
    "@id": "https://example.com/#organization"
  },
  "serviceType": "Precision CNC Milling",
  "areaServed": "US"
},
{
  "@type": "WebSite",
  "@id": "https://example.com/#website",
  "url": "https://example.com",
  "name": "Apex Precision Machining",
  "publisher": {
    "@id": "https://example.com/#organization"
  }
}
Repeat the Person or Service pattern only for the rows you inventoried. Check each person’s role, credentials, and subject areas against the client’s pages before keeping those properties. A plausible-looking credential is still a bad field if the client never claimed it.
Expected result: worksFor, provider, and publisher each point to the organization’s existing @id. Each service URL identifies its own page; the website node identifies the site.
Mistake: Pasting a full new Organization object into every provider or worksFor field. Define the organization once and reference it. If the node is not connected to the right business, adding more properties will not fix it.
Step 4: Add sameAs links you can defend
A site can say who it is; sameAs points to other URLs that identify that same entity. That makes this the step where careless copying hurts most. As Knowledge Graph Navigator explains, sameAs is an identity assertion, not a list of articles about the business.
Return to the Organization node. Add a comma after its contactPoint object, then add this property. The tokens below are placeholders, not profiles to publish. Replace each with a checked URL, and remove entries the client does not have.
"sameAs": [
  "{{VERIFIED_WIKIDATA_URL}}",
  "{{VERIFIED_CRUNCHBASE_URL}}",
  "{{VERIFIED_LINKEDIN_URL}}",
  "{{VERIFIED_MAPS_CID_URL}}",
  "{{VERIFIED_REGISTRY_URL}}"
]
Check where each URL lands. Confirm that its subject is this business, not a similarly named firm, a directory category, or an article mentioning the client. Compare the business name and available location and contact details with the inventory. Correct stale profiles where you can; omit uncertain ones.
Expected result: A short array of independently identifiable profiles. Four to six may be available for one client; another may have fewer. An empty optional entry should not become an empty string in the published JSON.
Mistake: Adding 30 scraped directory listings to make the graph look substantial. Volume does not settle identity. Neither does a polished-looking URL if it belongs to the wrong Apex.
Step 5: Validate the graph, not the prospect of a rich result
Save the complete JSON document. Test it before wrapping it in an HTML <script> tag. Use two tools for two different questions: whether the structured data is valid, and whether Google identifies an eligible rich-result feature. Linkbot’s comparison of structured-data tools makes the distinction useful here.
- Open
validator.schema.org, select Code Snippet, paste the JSON, and run the test. Fix JSON errors and inspect any property warnings rather than blindly deleting fields. Check the displayed organization, person, service, and website nodes; confirm that their@idstrings and references match your inventory. - Open
search.google.com/test/rich-resultsand test the markup. A message that no rich results were detected is not, by itself, a failure for this entity graph. Fix parsing errors, but do not remove valid entity markup just to make an ineligible graph produce a visual search feature.

Expected result: The JSON parses, the intended nodes appear in the schema validator, and their references use the right absolute URIs. You understand any remaining warnings before deployment.
Mistake: Treating “No rich results detected” as proof that Organization and Service markup is broken. It answers a different question. Conversely, a clean parse does not prove that a profile URL identifies the right company; that check happened in Step 4.
Step 6: Put the payload in the HTML header
Wrap the validated JSON in the script element below, placing the full document between the tags. Then use the client’s CMS route to print it into the page’s HTML. I would not put this implementation in a Google Tag Manager Custom HTML tag: the client-side execution adds a dependency you do not need when the goal is for the markup to be present in the fetched HTML. Swing Intel’s discussion of AI crawler behavior is a useful reminder to check what a crawler receives, not just what your browser eventually renders.
<script type="application/ld+json">
{{VALIDATED_JSON_DOCUMENT}}
</script>
Choose the route that matches the site:
- Webflow: Open Site Settings > Custom Code > Head Code, paste the script, and publish to the custom domain. Webflow’s native custom-code field supports up to 50,000 characters.
- WordPress: Use a lightweight code-snippet manager or the child theme’s
functions.phpwithwp_headto print the script in the header. Check existing SEO-plugin output so you do not leave conflicting organization graphs in place. - Shopify: Open Online Store > Themes > Actions > Edit Code, find
theme.liquid, and place the script immediately above</head>.
Expected result: The published HTML contains one version of your graph with the client’s actual values.
Mistake: Checking only the CMS editor or browser’s rendered DOM and assuming the original response contains the markup. Publish, then inspect the live response. That is the artifact this step is meant to change.
Step 7: Turn the first graph into a 15-domain template
Once the first payload is live, keep its structure and replace client-specific strings with tokens. Template the fields; do not template away the identity checks. Create one spreadsheet row per domain using these replacements:
{{CANONICAL_DOMAIN}},{{LEGAL_NAME}}, and{{BRAND_NAME}}.{{STREET_ADDRESS}},{{LOCALITY}},{{REGION}},{{POSTAL_CODE}}, and{{PHONE}}.{{SAME_AS_ARRAY}}: A formatted JSON array of verified URLs, not a comma-separated cell pasted inside quotation marks.{{FOUNDER_NAME}},{{FOUNDER_TITLE}}, and{{FOUNDER_URI}}, when a person node belongs in the graph.{{SERVICE_NAME}},{{SERVICE_URL}}, and{{SERVICE_DESCRIPTION}}for each service node.
Make the organization @id from {{CANONICAL_DOMAIN}}/#organization; build the website and other node IDs consistently from that domain and their permanent pages. A Python string-substitution script or spreadsheet SUBSTITUTE formula can generate the client payloads. Generation can take under ten minutes for a 15-domain batch. Review and deployment are separate work. Fifteen fast substitutions are not fifteen validated sites.
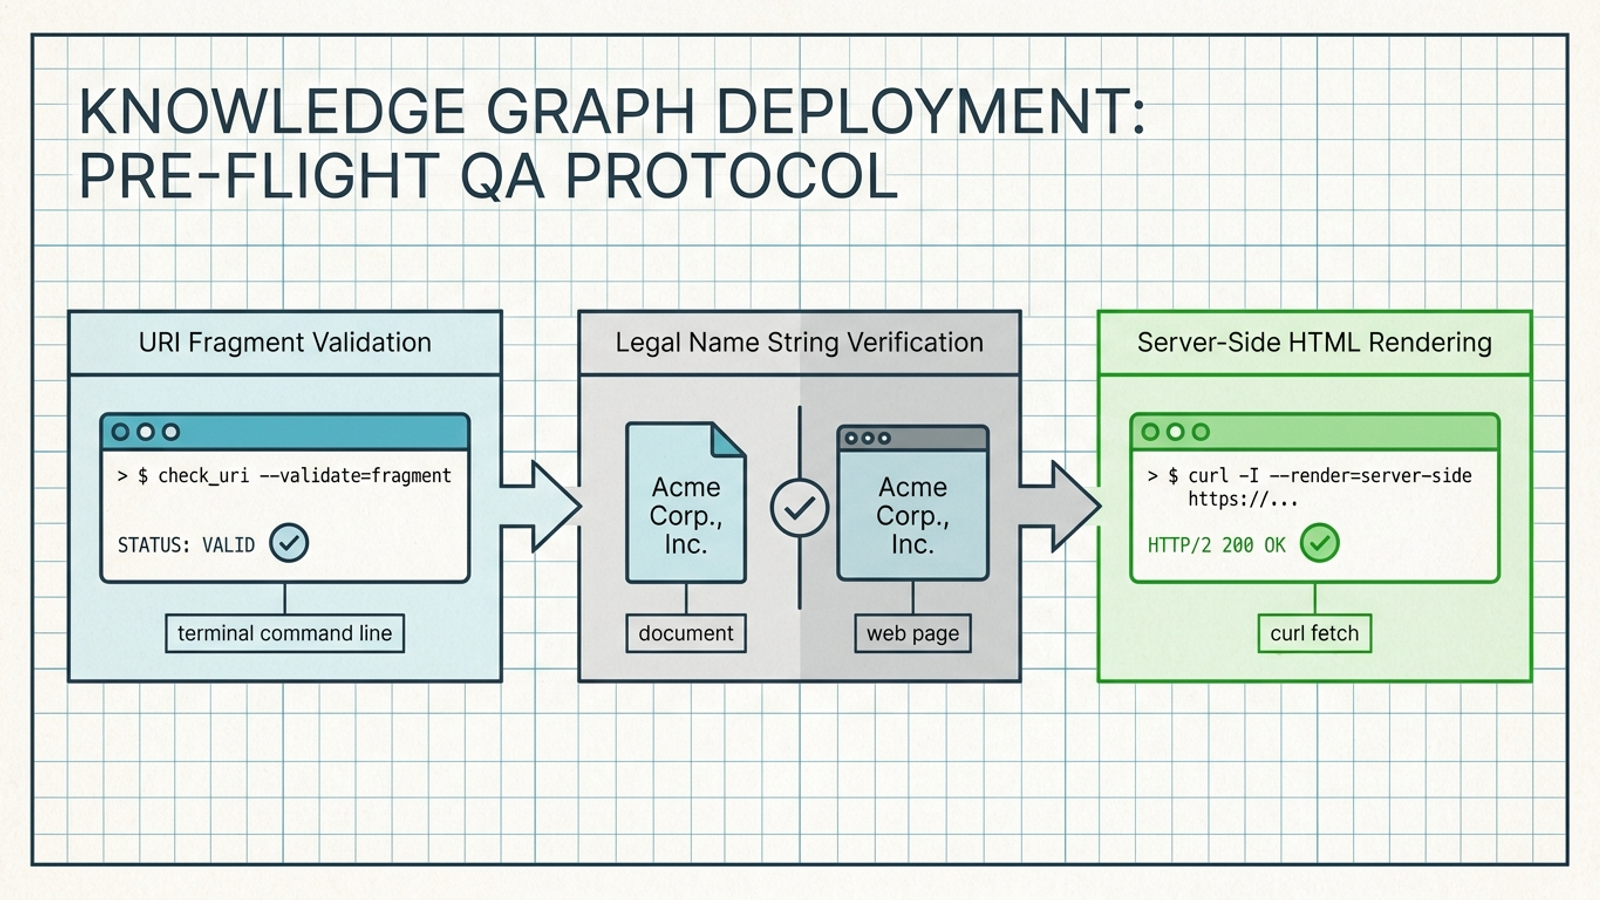
Run this QA pass for each generated payload:
- Check URIs. Confirm that each
@iduses the right canonical domain and that every pointer matches its target. Look for mixedhttpandhttpsvalues or an extra slash before#organization. - Check identity. Compare the graph’s brand and legal names with the relevant visible site text and business profiles. Check the address and phone number where they are published. Resolve differences rather than replacing a legal name with a shorter brand name everywhere.
- Check the response. After publishing, run the command below with that client’s live domain. It checks whether the response contains
application/ld+json; it does not, on its own, validate the graph.
curl -sL https://clientdomain.com | grep 'application/ld+json'
Expected result: Each domain has its own parsed, reviewed graph in the live HTML. Re-test a live URL in validator.schema.org and inspect the returned markup before marking that client done.
Mistake: Replacing example.com but leaving another client’s founder, service description, or sameAs URL in the file. String substitution is excellent at preserving yesterday’s mistake at scale.
Keep entity decisions human; automate the drift checks
Software can generate the repeated payloads and watch for changes. It cannot decide from a template which services matter to a client, whether a principal’s credentials belong on the site, or whether an old profile still describes the same business. Make those calls in the inventory.
Then automate the boring surveillance. Sulayman Bowles describes how structured data drifts when site changes leave markup out of step with visible content. Recheck the live HTML, required @id references, and business details after publishing changes. Spending agency hours opening 15 headers by hand every week to spot a missing script is not strategy. For the broader multi-client publishing workflow, see our guide to managing knowledge graphs and auto-publishing to client CMS.
Verify the first domain, then change the template
For the first client, finish with the live page, not the saved file. Fetch its HTML, find the JSON-LD script, run the live URL through the schema validator, and compare its organization name, relationships, and off-site URLs with your inventory. If those checks pass, save the reviewed payload as the template.
The first thing to change next is the client-specific identity data, not the graph structure: replace the domain, people, services, and verified profiles for client two, then repeat the QA pass. If you need to decide which buyer queries deserve attention before building out that client’s pages, the manual audit in our 30-day AI visibility playbook is the next task. The graph is reusable. The judgment is not.